Monthly Archives: November 2026

Organise your book

Part of the Lekhak guide.

Organise your book

The binder

Folders, documents and their types

Lekhak does not insist on a shape for your project. It contains folders and document files that can be dressed up to suit what you want to create. You may be writing a book, and put your chapters as files in it without any folders. You may be writing a series, and have folders for books and even chapters, with each chapter containing a few scene documents. You could be writing a recipe book, with some documents as chapters with regular text, while others are recipes that need specific formatting.

That’s why we have types and templates. There are no default types. By default, folders are folder and documents are documents – these types are the bare minimum and baked into Lekhak, even if you never use them.

Simply put, a type is a role a folder or document plays. Lekhak tracks types for folders and documents separately, as they are inherently different and not interchangeable. A folder type "book" can be applied to other folders, but not to documents. A document type recipe could be applied to other documents, but not folders. A project could contain only standalone flashfiction stories if you wish. You decide what you’re writing and how you organise it.

Types can be set in the metadata on the right where the collapsible menu says "Formatting related". A dropdown offers you the types that have been created in the document and next to it, a text box allows you to add a type. If the type exists for what you intend to do, you should select it rather than create a new one, as it will keep your templates manageable.

To style types, so that they can serve their intended purpose, you should use templates. A template document with the same name as the type will be selected by default and you don’t need to do anything further. If there is no template that matches the type, and the metadata for a folder or document also doesn’t assign one in the metabox, the folder and document templates are used by default.

The Type field is protected: you change it deliberately, and templates and the UI read it rather than anything else. A document that should not appear in an export at all can be given the no-export template (or the no-export set), which prints nothing — without a separate kind to choose by mistake.

A row in the binder is moved by dragging it: drop it between two rows to place it exactly there, or onto a folder to put it inside. If a move cannot happen — usually because the destination already holds a file of that name — nothing is written and the binder is put back the way the files are. Lekhak would rather say no than quietly rename something you made.

You can find out more about templates later.
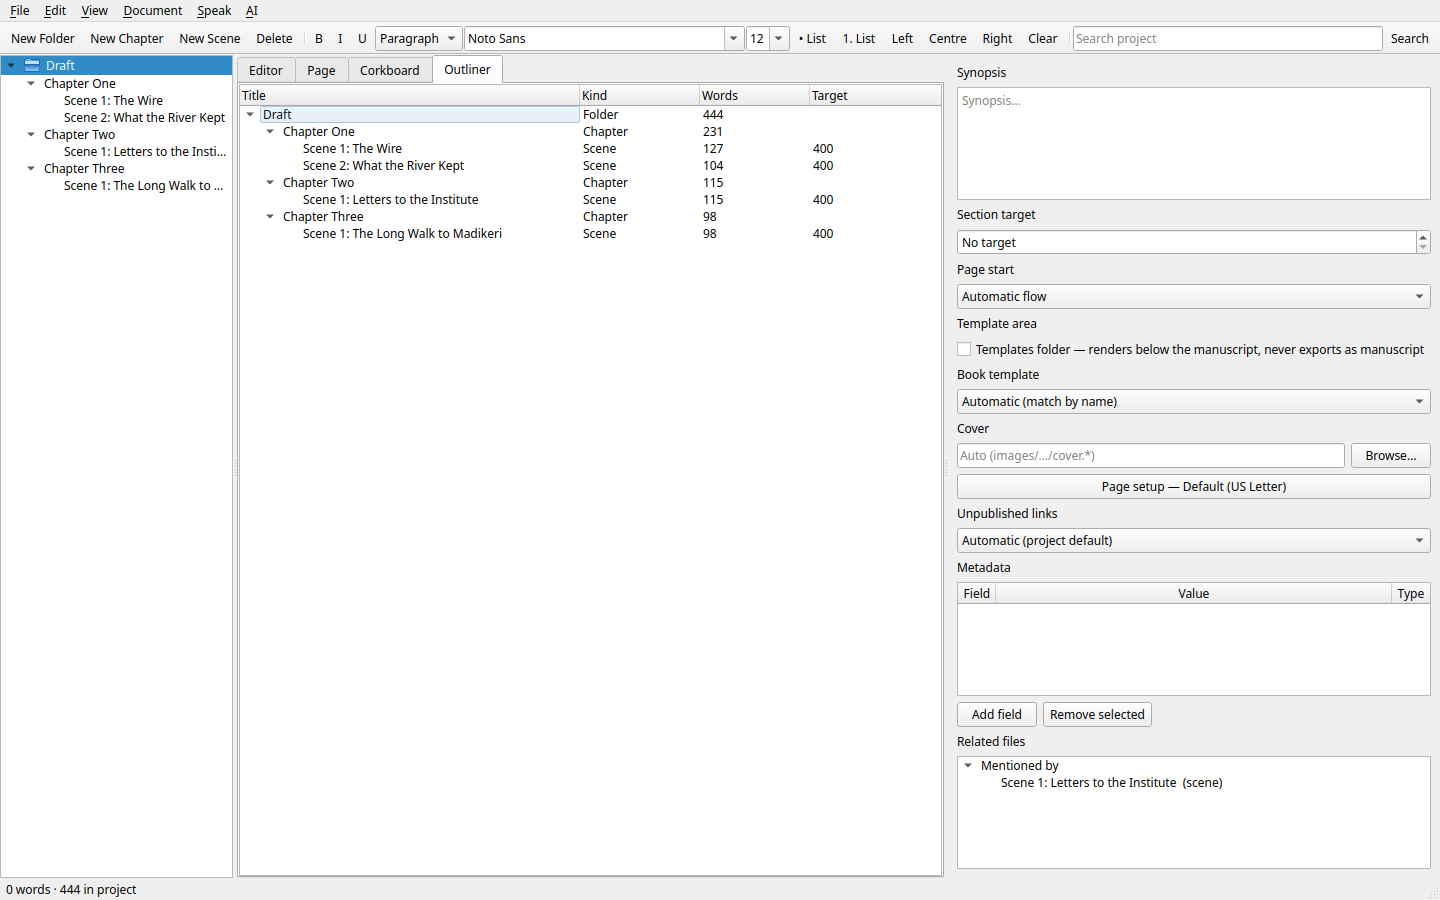
Lekhak outliner showing title, kind, word counts and targets
The outliner shows your project as a table with columns and counts.

The outliner

View → Outliner (or the tab beside the binder) shows your book as a table: title, type, word count, and whatever metadata columns you have asked for. It is the same book, read as a list — useful when you want to see the shape of a folder’s documents rather than its sentences.

Document → Outliner Columns… chooses the columns. The list is taken from your own project: the four the table always has, and every metadata field your documents actually carry, so what you can add is what your book has rather than a fixed set. A column shows the value a document has, including one it inherits from the folder above it.

Select more than one row and Bulk Edit… appears above the table: change the Type or the metadata of everything selected at once, which is the quick way to mark a run of documents as done, or to give them all the same point of view.

Expand all / Collapse all in the outliner opens or closes the whole tree at once. Quick Open (Ctrl+Shift+P) jumps to any document by title across the project.
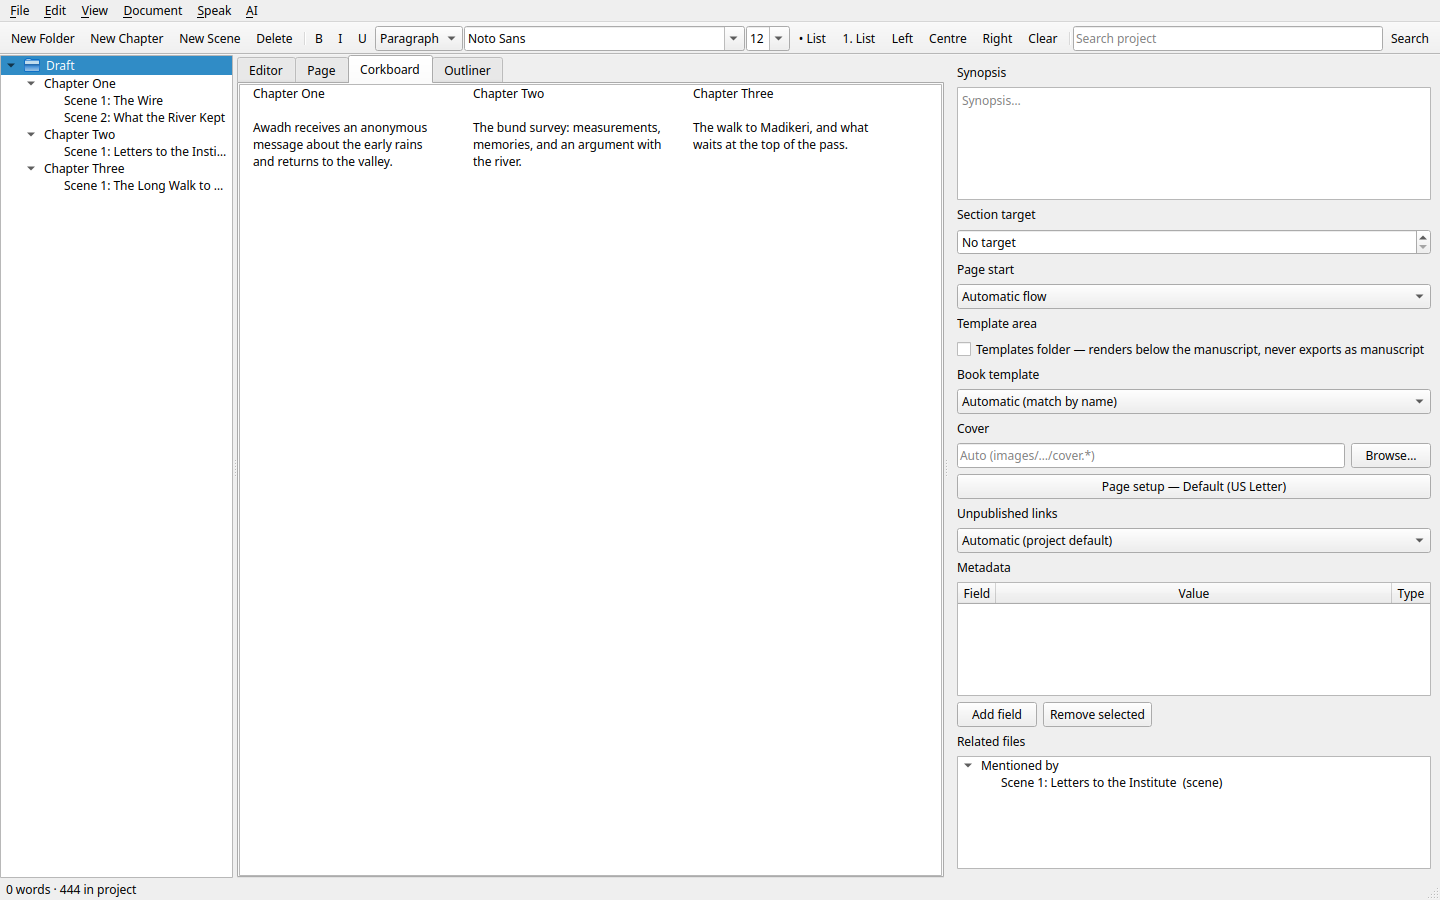
Lekhak corkboard showing cards and synopses
The corkboard shows your structure as cards with synopses.

The corkboard

The corkboard is one card per document, laid out under the folder you selected. Each card carries the title, the synopsis, and the word count.

It is for seeing a book as a set of pieces: which scenes are done, which are stubs, which two say the same thing.

A single click on a card opens its synopsis, so you can write the one-line account of a scene without leaving the board. A double click opens the document itself.

The cards sit in the binder’s order. To move one, drag it in the binder: the corkboard is a way of seeing the book, not a second place to rearrange it.

Types

Every document has a Type: Folder, Document, or a name you make up (Leaf, Poem, Interview, Chapter, Scene — whatever suits your book). The Type is what templates dress and what you filter by.

If you have selected a folder or document, the dropdown will offer types applicable to it. Using existing types and creating new ones only when you need new kind of formatting helps keep the export formatting manageable. By default there is one type for folders (Folder) and one for documents (Document). If your text is straightforward and does not need custom formatting of different types, you can simply customise the folder and document templates – this is great, because it removes the need to assign types and templates.

You can use the text box to add a new type. Once a type is created for a folder, it will show up for all future folders. And the same with documents.

To apply templates to types automatically, your template should have the same name as the type. For example, if you have a type called "recipe" and your template contains a template formatting document called recipe.html – it will automatically be used to format exports for the recipe documents.

You can override this assignment by explicitly selecting a desired template in a document’s metadata. For example, if you have most recipes formatted in a certain way, but one needs to be handled differently, you can select a different template for it in its metadata and it will override the automatic selection for that document.

A document that should not appear in an export at all can be given the no-export template (or the no-export set), which prints nothing — without a separate kind to choose by mistake.

Metadata

Fields and values

Metadata is the information about a document: its status, whose point of view it is, when it happens, whether you have finished it. Lekhak keeps it in a small table under the text, and you decide what the fields are.

To add a field: select the document, and in the inspector’s Metadata panel press Add. Type a name — Status, POV, Date, Word target, Location, anything — and it becomes a field of that kind of document. Every other document of that kind now offers the same field, empty, waiting.

These fields can be used as placeholders in templates by wrapping them in curly brackets and prepending with "$". So, if your metadata has a field called PoV and its value is "My Awesome Hero", you could use the field to create your title in the template. For example: <h3>$${PoV}</h3> and the exported file will have the title "My Awesome Hero". If another scene has the PoV: "Villain guy" the title for that scene will become "Villain Guy" – these replacements are only done during the export and within the software itself, you will see fields and values in the metadata, and placeholders in the templates.

Project metadata

With nothing selected — or with a folder selected — the inspector shows the whole-project fields: the Author, the synopsis of the book, and anything else you add. Every document can read them, and a document’s own value wins over the project’s.

This is where Author lives, which is why a title page can print it without every chapter having to carry it.

This is the place to add project-wide metadata: anything you add here becomes a placeholder available in every template, under its own name and as Metadata.<name>.

The Type field

One field is protected: Type. It is the document’s role (Folder, Document, or a name of your own), and it is what templates dress. It cannot be edited away by accident, and it is never exported as ordinary metadata — it is the book’s structure.

Metadata is managed by type. Create a field on one document of a type and it becomes available on every document of that type, empty and waiting. A Recipes type with an Ingredients field shows that field on every recipe document, and a recipe template can read it; a plain document with no type never shows it and never uses it. So the type you give a document decides which fields belong to it.

What metadata is for

Mostly three things:

  • Keeping track. A Status field with Draft, Revising, Done turns the binder into a progress report.
  • Printing. A template can ask for any field, so an epigraph, a point of view, a date or a quotation can appear on the page without being typed into the prose.
  • Finding. The project-wide search covers metadata as well as prose, so POV: Jack finds every scene that is his.

The content of a book can use metadata and placeholders too. If you haven’t named your villain, you could write your story with $${Villain} and when you decide on the name, add the field “Villain” to the project-wide metadata and it will be replaced during export. If you want the replacement to happen in the project text, you will have to use search and replace.

Or, if you want to use tags on a scene and then print them in the text, you could do that. Field called “tags” in the metadata, placeholder $${tags} in the document. Just remember that placeholders are processed during export.

Metadata applies to a type of document. So if you add a metadata “PoV” to a scene type document and “Plant” to a nursery document, the nursery document will not show PoV and the scene won’t show plant, but all nursery type documents will have an empty field for plant until you fill it. And all scene type documents will have “PoV” fields.

Edit Metadata (Document menu) opens the full metadata editor for the selected document. Known fields are remembered per group (folder or document type), so a field you create shows up on other documents of that group. Outliner Columns (Document menu / outliner) lets you show metadata columns in the outliner to scan by status, POV or any metadata field.

Media (inspector) lets you attach images to a document; they are copied into the project and shown as thumbnails. Cover can be set on folders in the inspector (auto-detects images/<folder_id>/cover.* if left empty).
Templates and export

Part of the Lekhak guide.

Templates and export

What a template is

A template decides how an export looks. It is a folder of fragments — small pieces of HTML — plus a print configuration file, and Lekhak reads them to dress your manuscript.

You do not have to write one. Five sets ship with Lekhak, listed under View → Template Sets:

  • default — the ordinary book: title, prose, pages.
  • short story — a unit-dressed collection on A4.
  • Book — one page per kind of thing, named after the Type it dresses.
  • Guide — a manual: a shaded heading page and a section page, the two Types this guide is written in.
  • no-export — prints nothing at all. It is there to keep a folder out of an export, and to show that silence is a valid answer.

They live in the software, so there is nothing on disk to edit. Right-click one and choose Duplicate into project… to get an editable copy in your own project.

A set can dress one format differently: a subfolder named epub, html, docx, pdf or text overrides the parent set for that format only. A document can name its own document template in the inspector to override the set. The Templates view (View menu) lets you edit templates; the CSS editor writes the set’s style.css for HTML and EPUB.

Scope for export can be the whole project, a folder, or a selection (folders expand). no-export keeps a folder out of an export.

Editing a template

The easiest way to make a new template is to duplicate a default set in View → Template Sets, open the copy, and make the changes you need. A fragment is HTML with placeholders in it:

<p class="chapter-title">$${Title}</p> <div class="children">$${children}</div>

$${Title} is the document’s title. $${Content} is its prose. $${children} is everything inside it, each child dressed in the template that applies to it, in the order you arranged them. Naming the children is optional: an export always walks the selection in order, so a fragment that never mentions them has them printed right after itself. The placeholder is for positioning — a chapter that should carry a closing note after its scenes puts $${children} first, then the note.

The Placeholders… button in the template panel lists every name Lekhak knows, with what each one means — including the fields of your own project and the Types in it. It is also how a name gets written: click one and it lands, complete, at the cursor of the box you were in. Typing the placeholder also works. The buttons are merely to prevent errors that may prevent the correct insertion of the data.

If you spell a name wrong, the template still saves and Lekhak tells you: this template names a placeholder Lekhak does not know. Saving anyway is deliberate — a template can be written before the document or the field it names exists. At export, a placeholder that still has no value prints nothing: the name is removed and replaced with nothing.

As well as the config box, the panel gives the page’s print settings as fields — they shape DOCX and PDF exports. Page size, margins, mirror margins and page start are rows you pick from. Below them, the Header and footer rows hold the running head and foot as the three places a piece can sit — left, middle and right. A pick above them says which pages the rows are speaking for: the Main body, the Facing pages (even) that a mirrored book prints differently, or the First page, each section’s opening page — the one a chapter opener usually leaves bare. A row you leave empty keeps the sample’s own head; tick None and these pages carry no head at all. Each row writes one Header: or Footer: line into the config box, so the box stays the truth and nothing is hidden behind the fields. Below the rows, Header and footer font writes the running heads’ own family and size as a single Head font: line, for the header and the footer both; left alone, the sample’s own head stands. If you never export for print, you can safely ignore these fields.

Choosing what to export

File → Export… asks two things: what to include, and how to dress it.

The scope is the selection in the binder, or the whole project if nothing is selected. You can select several folders and documents at once; the export takes them all, in binder order. Selecting a folder exports what is inside it.

The dialogue offers the template your content asks for. Assign a template in the metadata of a folder and everything below it inherits the assignment, until another folder overrides it; the deepest assignment inside the selection is the one offered. Export a chapter from a book folder and the book template’s folder and document fragments still dress its scenes. The pick is a default you may change, and the change is one-off: the next export offers the detected template again. To make a choice stick, assign it to the topmost folder it should cover.

A set can dress one format differently from the rest. A folder inside it named after a format — docx, pdf, epub, html or text — applies to that format only, and the set’s own files cover every format without one. So one set with a docx folder can print one design and hand EPUB another, from the same assignment.

Between the placeholders and the template a scope asks for, a book can be dressed in as much detail as it needs — and when nothing matches, the export is still valid: the default template’s folder and document fragments print the selected material.

Formats

  • Plain text — for pasting anywhere.
  • HTML — one file, with a stylesheet.
  • DOCX — for Word, and the basis of the PDF.
  • PDF — via LibreOffice, if it is installed.
  • EPUB — the ebook.

File → Print… (Ctrl+P) makes the same PDF and hands it to your system printer.

Page setup

The book folder’s Page setup button is where paper lives: page size or a named trim, the margins, mirroring for a book, and the gutter at the spine. Set it on the book folder — the nearest one above the document wins, so a series folder can give all its books one trim. Where pages begin and what the running heads say are not in this dialogue: those belong to the template’s design, in the template panel.

A template’s own configuration overrides page setup, and page setup overrides the built-in A4 — so you can set the trim once for the project and let a template change it only when it has an opinion.

The running heads and feet read placeholders. A line like Header right: , ,$${PageNo} puts the page number at the right of every page. $${PageNo} is a position, not a count: Word or LibreOffice fills the number in, so it stays right as the text reflows. You can also put $${PageNo} on a line of its own in the text, and the export writes the number at that spot. Formats with no fixed pages — HTML, EPUB and plain text — print nothing for it.

$${BookTitle} names the book you are exporting: the folder you chose, or the project’s own title when you export the whole project. Export a single document or chapter and there is no book, so it prints nothing — nothing is ever invented to fill it.

A running head on a chapter’s opening page usually looks wrong, and most books leave it off. Header first page: none says so; Header first page: , ,$${BookTitle} says the opposite, an opening page with a head of its own. The footer has the same pair. These lines speak for each section’s opening page — every chapter, where chapters start a new section.

Running heads are often set smaller than the body. Head font: Georgia, 9 gives the header, the footer and the page number their own family and size, and leaves the body’s typography alone.

Page size accepts inches, millimetres, named sizes (such as A4) or values like 5x5. A divider between child documents (in page setup) can print a separator such as * * * between children of a folder, or nothing at all.

print-config.txt in a template overrides page setup; a sample .docx supplies the rest. Page setup applies only where the template is silent.


Import your work and keep it safe

Part of the Lekhak guide.

Bring work in and keep it safe

Importing

Bringing your work in

File → Import Markdown… reads a markdown file and makes documents out of it. Markdown import can read Lekhak’s own markdown export format (markdown with a YAML block above each heading) and markdown exported from other writing software, as long as the file is structured clearly enough for Lekhak to read.

For the smoothest result, export your work as one markdown file in the correct sequence. Lekhak can split that file into documents by headings and build a tree from it. If your source project has metadata you want to keep, include it in YAML blocks so Lekhak can read it as fields. World-building material such as character, location, item or story-arc notes can be imported as regular content documents in the same way.

File → Import from Lekhak Project… lets you bring folders or documents from another Lekhak project into the current one. Choose the source project, select what you want to import, and Lekhak copies it into the current project (under the selected container, or at the top level) with its structure, order, content, metadata, type and template information.

Imports land under whatever you had selected in the binder — or at the top of the tree when you had nothing selected.

What survives

Information that is present in the imported markdown can be brought in, but it is your responsibility to ensure the file contains what you need. Metadata included in YAML blocks can be read into fields; the rest of the content is imported as text.

When a YAML value is read, Lekhak chooses a field type from what it sees: an ISO date becomes a Date field, true or false becomes a Checkbox, and anything else is Text. This recognition can be wrong; you can change a field’s type afterwards if needed.

Some names are handled specially during import. Template and Template config are treated as design markers rather than ordinary metadata fields. Type is kept as the document’s role. If imported names conflict with names Lekhak reserves, the result may need adjustment after import.

Project-level keys (such as Author, Title or Copyright) fill the project’s own fields only where you have not already set them. Values you have already set are kept.

Markdown import has not been robustly tested across every writing tool and export style. It is included because writers often need to bring existing projects in, but mapping one customisable tool’s export to another’s structure can be complicated. Expect to review and tweak the result, especially for heavily customised projects, and report problems on GitHub if you run into them.

The tree

Markdown import works best when the file already expresses structure. A single file exported in the correct order is easier to bring in than many separate pieces: Lekhak can read nested headings, split the document into sections, and place those sections into the binder as a tree.

Headings and document structure in the file are used to infer chapters, scenes and containers. When a scene in an export does not state a parent, it may be placed under the chapter before it, in the order the export wrote. The exact result depends on how clearly the source export marks structure, so some rearranging may still be needed after import.

If you want metadata to travel with the text, include it in a YAML block where it belongs. For example, to keep per-scene notes from another tool, you can export or add a block like this before the scene text:

—
Characters: Tom, Dick, Harry
Location: Fantasy Land
Magical item: wand, unicorn
—

Lekhak can read those keys as metadata fields for the imported document or scene. The key is to make sure the information you care about is actually written into the markdown you export, not only stored inside the original application.

Nothing is overwritten

An import only adds. It never touches a document you already have, and it never replaces a file you have written. If something goes wrong, the imported documents are simply documents you can delete.

Exporting back out

Markdown export is not currently available. For now, use the other export formats (such as plain text, HTML, DOCX, PDF or EPUB) depending on what you need the output for.

Versions and safety

Snapshots

Document → Create Snapshot… keeps a named copy of the document as it is now. Snapshots are kept until you delete them.

Make one before a big change — a split, a merge, or a rewrite of a chapter — and if the change was a mistake, Restore Snapshot… puts the document back as it was in that snapshot.

Backups

Ctrl+S saves the project and can create a backup. A backup is a full copy of the project folder as it stands, stored outside the project.

File → Choose Backup Folder… sets where backups are stored. If you do not choose a folder, backups are placed in a Backups folder beside the project, in a subfolder named after the project. Keeping backups outside the project means they are not lost if the project folder itself is deleted or damaged.

You can choose how often automatic backups are made in Preferences → Files & saving (for example on close, hourly, daily, weekly, every save, or never automatically). If you use Ctrl+S out of habit, a less frequent schedule can help avoid filling your backup folder with many near-identical copies.

Backup copies are named with timestamps. Lekhak avoids creating a new timestamped backup when nothing has changed since the last backup, and it prunes older timestamp-named backups automatically. To keep a particular backup from being removed by automatic pruning — for example, one taken before a major change — rename it so it no longer follows Lekhak’s timestamp naming (for example, backup-1Dec2026).

The trash

Deleting a document moves it to the trash folder. The trash is a normal folder in the binder: you can look in it, drag something out of it, or empty it when you are sure.

Files in the trash keep a folder structure that mirrors where they came from. Restoring a file returns it to that original location by default; if you want it somewhere else, you can drag and drop it to the desired place in the binder.

Tracked changes

Tracked changes can be useful for collaboration, or when you want to review an edit later before deciding to keep it.

Content inserted or changed using the AI feature is always tracked, so you can accept or reject those suggestions.

Edit → Accept All Changes in Section and Edit → Reject All Changes in Section work on the document you are in. Revision Passes… keeps a set of named edits and works through them one at a time, so a pass of line edits can be handled deliberately rather than in one sweep.

Revision author is set in Preferences so tracked changes carry your name. Revision Passes… (Edit menu) keeps named passes over the manuscript so you can work through sets of edits deliberately.

Locking

A folder or document can be locked: it stays readable but cannot be written to, and everything inside a locked folder is locked too. This can be useful for already published books in a series, completed chapters, or other content you may need to refer to often but do not want to alter accidentally. The lock lets you open and read the content while keeping the file read-only.

Your files are your files

A Lekhak project is a folder on disk: your documents live in the folder tree, with files such as manifest.json, per-folder .order.json files, images/, templates/, trash/, and project.sqlite3 (used by Lekhak as an index). You can copy the folder, back it up, or keep it in version control like any other files.

If you ever need to access the project without Lekhak, the structure is readable: manifest.json records the root order, each folder’s .order.json records that folder’s sequence, and each document file carries its metadata as YAML in the head alongside the content. A regular file manager may sort files alphabetically or by date, but these files preserve the project’s intended order and metadata so your work remains accessible.

Backups go to a per-project backup location by default and can be scheduled (daily/weekly/on close); renamed backups are kept. Images live under the project in images/ and are referenced by the manuscript. Recent projects lists projects you have opened.


Optional tools and settings

Part of the Lekhak guide.

Optional tools and settings

Reading aloud and AI

Reading aloud

Speak → Read Aloud (F8) reads the document you are in, in a system voice. F9 pauses and resumes, and Stop stops it.

The menu only appears when the feature is switched on: tick *Text to speech* in Preferences. Lekhak uses the voice your system already has — SAPI on Windows, NSSpeech on macOS, espeak on Linux — so there is nothing to install and nothing is downloaded.

It is genuinely useful for prose: hearing a sentence finds the awkward ones faster than the eye does.

AI

AI → Continue Scene asks a model to carry on from where you stopped. AI → Proofread Selection looks at the text you have selected and proposes fixes — typos, grammar, doubled words, stray spaces — as the minimal edit, not a rewrite.

Both are off until you tick AI integration in Preferences and say where the model is:

  • A local model (Ollama) keeps everything on your machine. Nothing leaves the computer.
  • A hosted endpoint sends the text you ask about to that service, and nowhere else.

Whatever comes back arrives as tracked changes. You read them and accept or reject them one by one. Lekhak never applies an AI’s words to your manuscript for you, and never quietly rewrites a paragraph because a model suggested it.

The proofreading prompt is deliberately narrow: bloopers, not prose. It is for the mistakes and leaves your voice alone.

AI → Prompt… asks the model anything; the answer comes back as a tracked insertion at the caret.

Set it up in Preferences: Detect local servers finds an Ollama on this machine, Add API… stores a hosted endpoint, and Install Ollama + phi4-mini… puts a small local model in place. AI is off by default — tick AI integration to enable it.

What is sent and not sent

Lekhak does not phone home. There is no account, no telemetry and no upload. I have no idea who you are, what you are using the software for, or even whether you are using it.

The only outbound requests the app can make are the two you ask for: the AI endpoint you configured, and the update check in Preferences — which shows you the exact command to run and writes down what it did.

When you use an AI feature, the request you send includes the text you are working on. If you are concerned about AI services using unpublished work for training or other purposes, choose a service you trust or run a model locally so your requests do not leave your machine.

Settings

Preferences

Edit → Preferences… (Ctrl+,) holds settings that belong to you or to this installation, rather than to a single document. The settings are organised by category.

Appearance
Theme and interface font size. See also Appearance in this section of the guide.

Editor
Spell-check and the dictionary used for your project’s words (including project scan / word-list support where available). If you are unsure about defaults, keep the standard settings.

Files & saving
Autosave, reopening the last project on start, backup location and backup frequency. Backups are extra copies stored outside the project; if you press Ctrl+S often, choose a less frequent automatic schedule to avoid many near-identical backups.

Pasting
Choose which formatting is kept when you paste (fonts and colours, paragraph formatting, bold/italics/underline, alignment). If you are unsure, leave the default paste settings. You can always paste as plain text when needed.

Links
How unpublished links are handled, and whether the Mentions / Mentioned by (Related files) scan is enabled. The mentions scan can be useful in some projects and distracting in others; disable it here if you do not need it.

Placeholders
The project-wide placeholder names and values available to exports and templates, along with the full placeholder reference for the current project.

AI and Read aloud
Optional features. Configure the AI endpoint/model and read-aloud voice/rate here. Enable or disable them according to whether you want those features available in your workflow.

Updates
Auto, Check, Manual or Nothing. Auto and Check look for a new version once per day (the first time Lekhak starts on that date). Manual (default) checks only when you ask, and Nothing makes no network call.

Help
Version and system details (including Copy system details for bug reports), where the program and settings live, links for issues/code/blog, and access to the manual. Copied details do not include your manuscript or project path.

Appearance

Six themes ship: System (desktop), Light, Rose (dusky red), Earth (ochre/olive), Dark (grey sky) and Night rose. System follows your desktop light/dark; the rest are fixed palettes — there is no colour picker, because a theme you can fiddle with is a theme you have to fiddle with.

Pick one in Preferences. The accent colour belongs to the theme, and so do the button faces and the scrollbars: nothing is left in the colour it had before you switched.

Interface font size is also configured in Preferences → Appearance, alongside the theme, so you can adjust the app’s interface text and appearance together.

Spelling

The squiggles come from your system’s dictionary, plus a word list of your own. Words you mark as correct are remembered, per project, in dictionary.txt — a plain file you can read and edit.

Preferences → Project scan scans your project for words Lekhak does not recognise and lets you review them in batches, so names and other project-specific terms can be added quickly.

Keyboard shortcuts

| Keys | What | |—|—| | Ctrl+S | Save and back up | | Ctrl+Z / Ctrl+Shift+Z | Undo and redo | | Ctrl+B / Ctrl+I / Ctrl+U | Bold, italics, underline | | Ctrl+Enter | Page break | | Ctrl+K | Split at the cursor | | Ctrl+F / Ctrl+Shift+F | Find in this document / in the project | | Ctrl+Shift+H | Replace in the project | | Ctrl+Shift+P | Quick open | | Ctrl+L | Link to a section | | Ctrl+, | Preferences | | F11 | Focus mode | | F8 / F9 | Read aloud, pause and resume | | Ctrl+plus / Ctrl+minus / Ctrl+0 | Zoom in, out, reset |


Support Lekhak

Part of the Lekhak guide.

Support Lekhak

Lekhak is written by one person: no company behind it, no marketing budget. If it earns a place in your writing life, these are the ways to keep it going.

Send a gift — PayPal
https://paypal.me/VidyutG
A one-off gift, entirely optional: the software is free and open source whether you send one or not.

My books — Abrahamha’s Strays
https://vidyut.net/category/books/
The science fiction I write, set in a world of dorms, domes and immortal sisters. Buying or reviewing them is the other way this work gets paid for; both are on Kindle Unlimited, so reading them costs nothing extra if you subscribe.

The newsletter — subscribe
https://vidyut.net/newsletter-signup/
Occasional notes on the writing, the books and this software: what changed and what is coming.

Tell someone. There is no marketing budget here, so a recommendation goes further than anything else on this page: the software to a writer who would use it, and the books to someone who reads this kind of science fiction.

Report a bug or ask for a feature
https://github.com/Vidyut/lekhika/issues/new
Problems and requests collect in one place, so they can be fixed and built. Copy the system details from the Help page first, then say what you did, what happened, and what you expected.


Write and edit your manuscript

Part of the Lekhak guide.

Write and edit

The editor

The editor is a rich-text editor that stores what you write as ordinary HTML. Select text and press Ctrl+I, Ctrl+B or Ctrl+U; use the paragraph style box for headings and body text; the alignment buttons do what they say. The usual stuff.

Images go in through Edit → Insert Image…: pick a file and Lekhak copies it into the project so the document travels with it. Alignment is the only layout on offer — inline, left, right or centre — because anything beyond that is a different kind of software. Left and right float the image with text flowing around it; centre puts it on its own line.

The word count for the document you’re writing as well as the book update live in the bottom right status bar.

The unusual stuff are the buttons unique to Lekhak. If you have TTS configured, the "Read aloud" button will read your text aloud. If you have an AI configured, the "Proofread" button can check your text and suggest corrections as tracked changes that you can accept or reject. At no point will your text be altered without your knowledge.

What text is decided by this:

1. If text is selected, it will be read/proofread.

2. If you place your cursor in the text, from there onwards.

3. If no cursor is active in the text, the whole document.

Split at the cursor (Ctrl+K) splits a document. Undo/redo, find/replace, focus mode and zoom are all available; the editor remembers where you were.

Styles, fonts and zoom

Paragraph styles live in the toolbar above the text. A style is a paragraph’s role (Heading 1, Quote, Body Text); it is not a font setting, so changing the body font later does not disturb your headings.

You can create and update styles in the editor itself. If you select a text and right click, you will see options to set the style as default, create new styles, or update an existing style. You can’t delete styles in the editor – you will have to go to preferences for that.

If you select unusual fonts in the editor, the export keeps them as named; the machine that opens the file needs those fonts installed. Please note, epubs uploaded to Amazon KDP may ignore formatting entirely or to various levels between the platform itself and the user’s preferences – this is outside Lekhak’s control.

Ctrl+plus and Ctrl+minus make the letters bigger or smaller for working in the editor without touching the font-size in the document at all (just like a browser). Ctrl+0 resets the zoom. This is the zoom you use for reading; it never becomes part of your formatting.

Focus mode

F11 hides the binder and the inspector, leaving only the page. It is the whole window for the words, and F11 brings the rest back.

Dates and page breaks

Edit → Insert Date puts the date at the time of writing at the caret; Insert Date and Time puts the date and the time. The format follows your system’s locale.

Add something like not to be confused with $${currentDate/time} placeholder which will insert the date/time at the time of compiling. A plain $${Date} placeholder is deliberately left available for you to use in your metadata if you need it, and it can be whichever date you want – you could insert the current date in its value, or a book set in a different time period could use it for the in-world date value. These explanations are simply added here to avoid confusion with the inserted date from the editor, which is directly the date at the time of insertion as text.

Ctrl+Enter inserts a page break: the text after it starts a new page, and the page view shows it there.

Paste

Paste is where Lekhak solves a common problem faced by writers who may need to copy-paste text back and forth for submitting for feedback or applying edits. Pasted text inserting the formatting like fonts, sizes and indents of the source text creates uneven formatting in the project, OR the opposite problem, where Ctrl+Shift+V strips all formatting and you lose your precious italics for emphasis, thoughts or other in-world elements.

This developer being an author with an active critiquing life herself, understands this. The default paste in Lekhak never inserts alien document formatting like fonts, indents, line spacing, sizes, etc, while retaining the character level emphasis, like italics, bold, or underline. So you can paste content into your document without worrying about the published document containing mangled formatting.

If your need to include/exclude formatting from the source changes, you can alter the behaviour of the default paste in preferences.

Paste comes in three flavours, chosen in Preferences:

  • Plain text — the words, none of the styling. Ctrl+Shift+V – unchanged.
  • Normal — bold, italics and underline, but not fonts and colours. Ctrl+V – our unique paste.
  • Keep all formatting — everything, as it came. (No shortcut; use Edit → Paste and Keep All Formatting.)

Plain text is the safe one when you are pasting from a web page that would otherwise bring its own fonts along.

Finding and replacing

Ctrl+F searches inside the document you are in. Ctrl+Shift+F searches the whole project, and Ctrl+Shift+H searches and replaces across it.

The project-wide search lists every place the words appear, so you can jump from one to the next — useful when a character’s name has to change in forty places, but replacing all is risky or when you want to know whether you have already said something.

Quick Open (Ctrl+Shift+P) jumps to any document by title. Standardise (Edit menu) normalises things like smart quotes or spacing.

Wiki links use [[Title]] to link to any section; hover to preview, click to jump.

The inspector can show Mentions / Mentioned by and Related files (documents that link to each other). The mentions scan can be toggled in Preferences → Links if it is distracting.

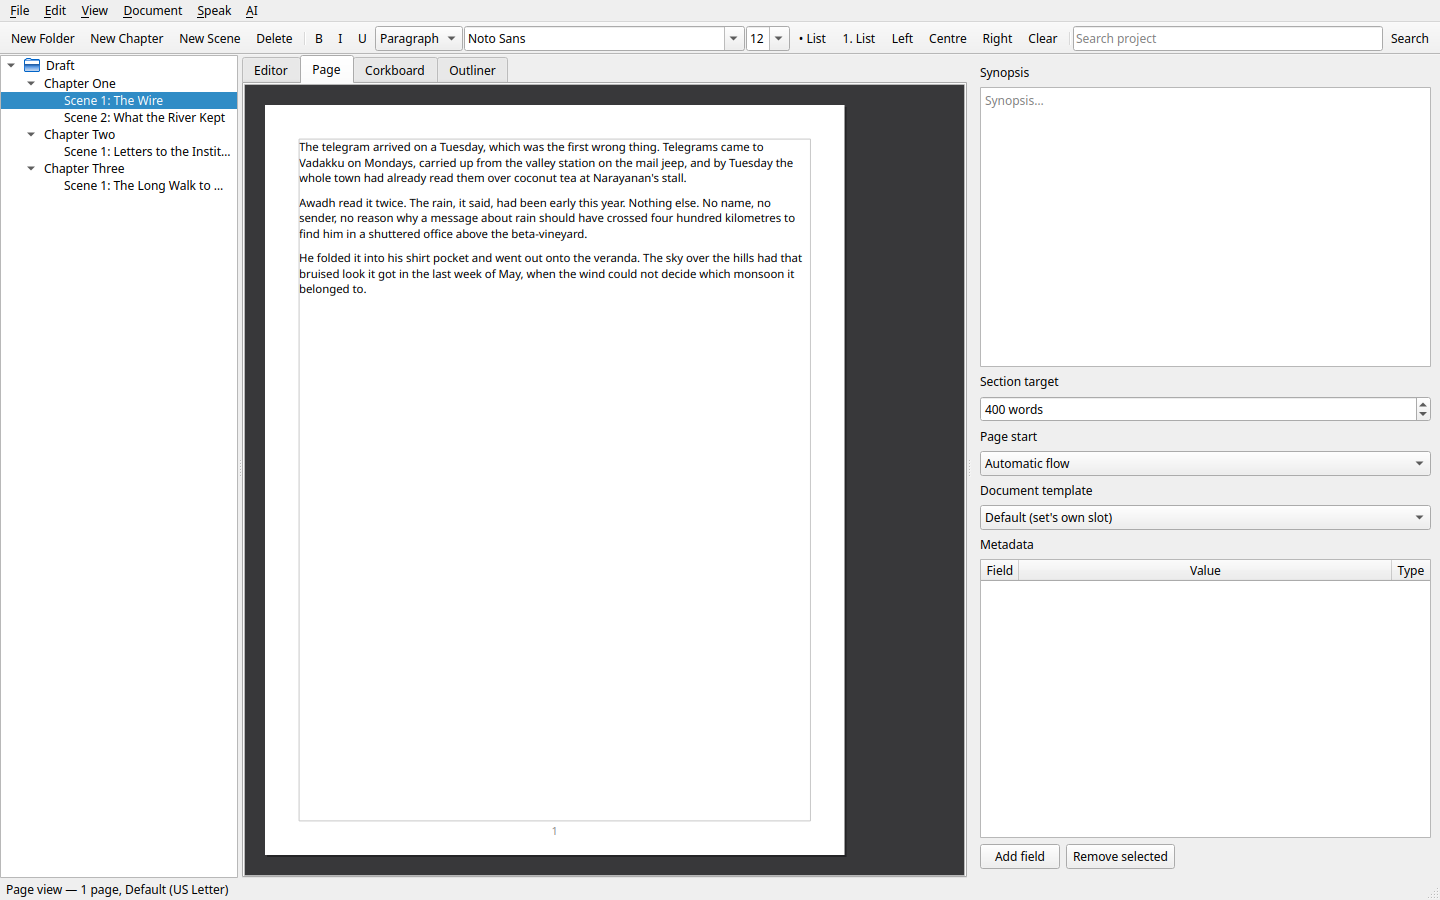
Lekhak page view showing a document laid out on a printed page
Page View shows the manuscript paginated as it will print.

Page view and pagination

Page View (a tab beside the editor) shows the manuscript paginated as it will print — paper size, margins and all. Page breaks you insert by hand and those from page setup/templates are shown.

Print (Ctrl+P) sends the same PDF to your system print flow, using the template set for the current scope.

Word counts, goals and progress

Word count is shown on every document, folder and the project in the binder and status bar. Reading time estimates are shown where counts appear. Session goal and per-section word goals can help track progress; the status bar clears honestly when nothing is selected.


Getting started with Lekhak

Part of the Lekhak guide.

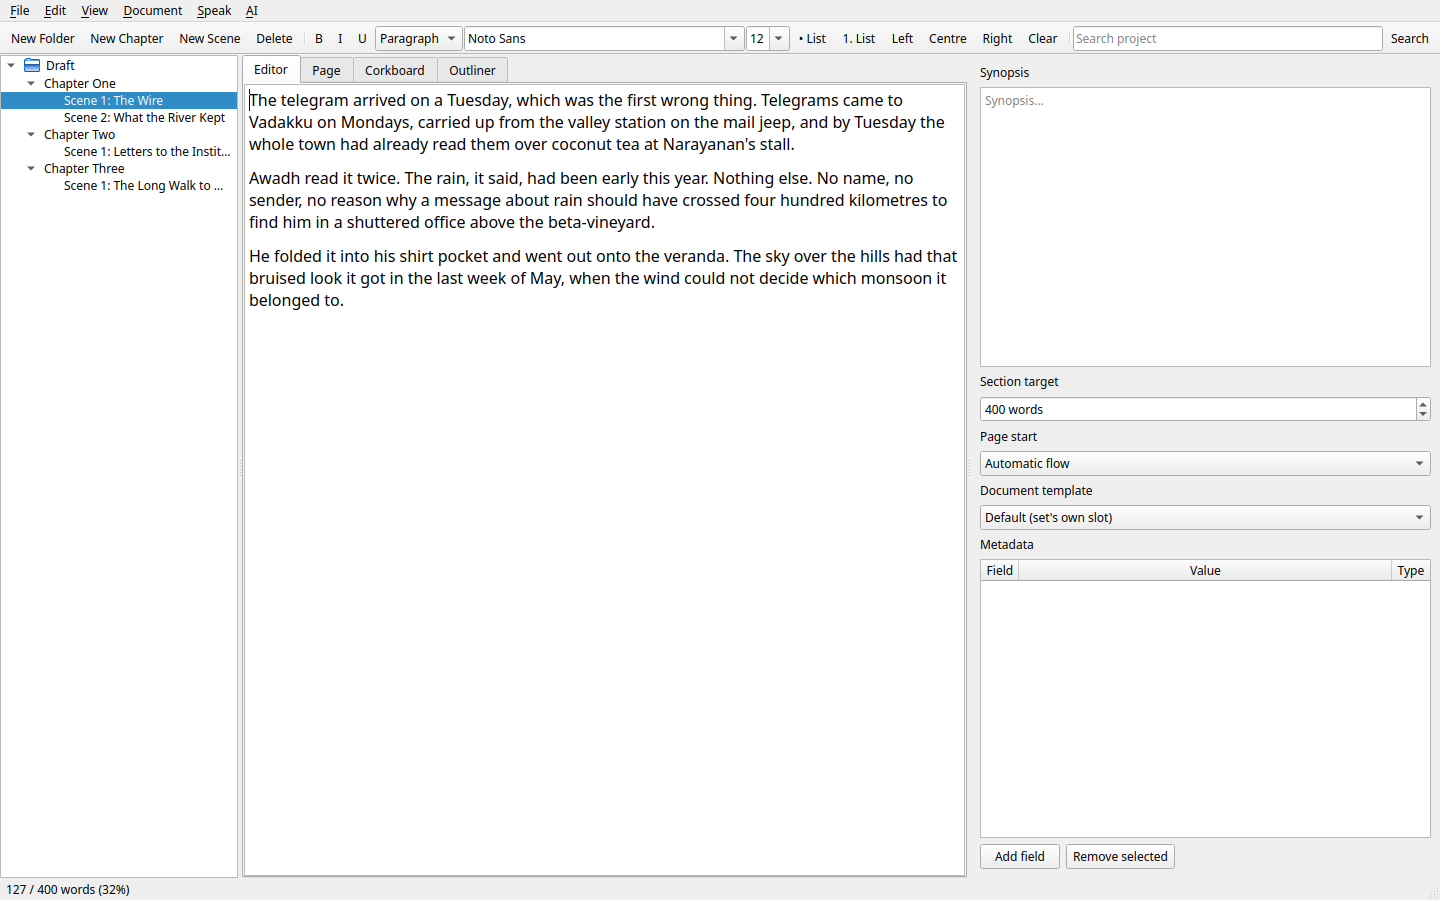
Lekhak editor showing the binder, a scene being written, and the inspector
The Lekhak window: binder, editor and inspector.

Getting started

What Lekhak is

Lekhak is a writing program for long work: novels, essays, anything with chapters that grow, or a place to keep and organise all your writing in folders. It keeps your manuscript in ordinary files on your own disk, gives you a place to write without thinking about formatting, and makes it easy to export a finished book when you want one.

The idea is simple: just write. Everything else — how the book is dressed when it leaves Lekhak, whether the pages are A4 or Letter, whether there is a title page — is handled by templates. The default should "just work" for most simple texts exported for online reading. Specific needs, like page sizes for publishing, are easy to configure. Extensive customisation is possible if you need it. Detailed guidance is in the Templates and export section.

As a writer, here is some reassurance I know will matter to writers.

Your writing stays yours. A project is a folder of files you can open, read, copy and back up. The data is always stored so that you can edit the raw files on the disk if you wish. Lekhak never locks your manuscript into a proprietary format.

Lekhak is designed to be intuitive to use, so that most features should be easy to understand and you don’t need a doctorate in software configuration to export your own work. If you run into problems, filing a bug on GitHub should get prompt answers.

This guide is also on my blog, where it is updated more often than the copy on your computer, which only changes when the software does. It can be useful to check the blog if you’re struggling with something.

By default, your project data does not leave your computer unless you explicitly configure an API, or something of that kind. There are extensive precautions to ensure your data is never deleted or overwritten without your knowledge.

Making a project

  • A project is a folder Lekhak keeps for one manuscript.
  • File → New Project… asks for a place to keep the files and a title.
    • The title is the project’s own name, and a template can print it with $${Project}.
    • Whether it appears in an export at all is up to the template.
  • A new project starts with one empty folder, called Draft.
    • Everything you add goes inside it: chapters, scenes, notes, and other folders.
    • That first folder is not special — you can rename it, move things into it, or delete it once you have somewhere better to put them.
  • For ease of use, consider making separate folders for what you intend to publish — books, essays, papers — and for other things: research, world building, characters, locations.
    • Inherited templates make configuring very easy: set the template for the whole folder and there is nothing more to do.
    • Only documents are exported, so stray research cannot slip into an export.
  • The software will export the documents you select and leave the rest out, regardless of how complex your document organising gets.

The three parts of the window

The binder is on the left: your project as a tree. Folders are containers that can hold more folders or documents (or other files, but they won’t be visible in the software)

The page is in the middle: where you write. Depending on your selection in the binder, it can show an editor, page preview for documents and an outliner and corkboard view for folders. More on each type in its section later.

The inspector is on the right and offers further information about the selection depending on the kind of document or folder selected.

Your first scene

Press New Document (the button at the top of the binder, or the binder’s right-click menu). A new empty document appears in a selected folder or after a selected file in the tree, and its title is selected. It is good practice to type a name straight away, as this will also name the file on your disk. If no name is typed, the created HTML will be named by the software, and you may not find it as easy to recognise if you decide to edit source files at a later date. Check to ensure the document appeared where you wanted it to. If a folder already has files, the new document may appear below them, but you may want it at a specific position. You can drag and drop to reorder and organise your project.

When you create the file, the page area in the centre automatically switches to the editor showing your new blank document.

Lekhak autosaves as you type, during pauses. You can close it at any time, and reopening brings you right back.

Ctrl+S saves the file intentionally (not really needed) and takes a backup. Backups are copies of the whole project kept outside it, so they survive even if the project does not; File → Choose Backup Folder… says where they go, and without it they land in a Backups folder beside the project.

Your word count for the document is in the status bar (bottom right of this window), with the reading time beside it, and the daily goal (if you set one) next to that.

Happy writing!